These days, there is no substitution between dial calipers and digital calipers for accurate and precise reading. From mechanical engineering to forestry, woodworking to medicine, science to metalworking, calipers are required everywhere!
Before you take the readings with a caliper’s help, you must prepare or calibrate the caliper.
The days of the Vernier scales are bygones. Today, we will discuss the dial caliper and digital caliper. Let us know how to calibrate a caliper properly to ensure the ultimate accuracy.
What is a Dial Calipers?
Dial calipers for reloading are mechanical calipers with a dial indicator for easy and intuitive reading. It doesn’t require any battery, and as a result, these are almost maintenance-free.
These only need occasional calibration. The calipers are fluid resistant. However, these have a single unit system, and so you get to measure in either mm or inch.
The rack and pinion might break if the caliper goes through dumps or fall downs. But, this is an affordable option for accurate and precise readings compared to Vernier calipers.
Do you know how to calibrate a caliper? Don’t worry; today, we will discuss digital caliper calibration and dial caliper calibration in detail.
How to Calibrate a Digital Calipers – The Step By Step Process
Here, we will go through the steps of Dial Calipers Calibration. The calibration processes of both calipers are different; however, both of them are easy.
Step 1: Remove the Residue
First of all, you have to go through the gauge blocks’ edges and wipe them out. Make sure you wipe the dial caliper jaws and the flat anvil.
Use a clean cloth for the process. When you are finished, your spindle faced a micrometer accurate to 0.0001 inches should also be cleaned.
Keep in mind that not every caliper will be perfect for you. And so, check Calipers for Reloading Buying Guide and make no mistake in buying the best one for you!
Step 2: Adjust the Measurement
Now, it is time to calibrate for zero. For this, you have to close the caliper jaws first. Complete closure is essential.
However, we highly recommend you not to apply force. The needle aligns to be checked with the “0” measurement on your dial. You might need to loosen the locking screw a bit in this situation.
Ensure that the dial is secured, and don’t forget to spin the bezel until you get the “0” markings. The more perfect you are, the better. After you reach zero, you have to tighten the screw.
Step 3: Calibrate Specific Measurements
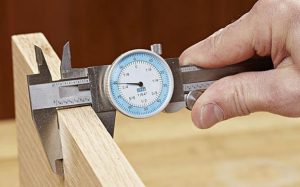
Now, get ready for calibrating, keeping the specific dimensions. First of all, get your hands on the dial caliper’s large outer jaws.
Now, close them gently. However, certify that the closure is firm around the edges of the 1-inch gauge block. Here, you have to keep the caliper measurement to 1-inch.
Re-do the same process keeping the 4-inch and 8-inch gauge blocks. Here, you will see accuracy variations.
In the first 4-inches of your caliper, allow the variations up to 0.0001 inches. In the 4-8-inch range, please keep it to 0.0015, and in the 8-12-inch range, the measurement will be up to 0.002-inch.
Step 4: Measure the Distance
Now, you have to decide on the micrometer at 1-inch. Now, get your hands on the anvil and spindle of a micrometer and close it with 0.0001-inch accuracy keeping a 1-inch gauge block.
With the help of gears, you have to tighten the locking screw or dial of the micrometer. Try to keep the spindle locked at 1-inch.
Now, you are free to slip the gauge block free. After this, measure the distance between the anvil and spindle of the micrometer.
Try to use small inner jaws. You will find that at the top of the dial calipers. Make sure the dial caliper measurement is at 1-inch.
Step 5: Repeat the Measurements
You have to go through the 4-8 inch micrometers and test the calipers if the previous ones are unavailable. Go through the same method you used previously.
Watch the video for more info.
What is a Digital Calipers?
Digital calipers for reloading, also known as electronic calipers, are the easiest caliper to read. These are available in different jaw lengths and styles. Converting these battery-powered calipers to metric into inches is accessible here.
Some models also afford the privilege of data output and memory features too. The digital calipers are expensive, require a battery, and are sensitive to water, dirt, oil, and magnetic field.
So, it requires careful treatment. But if you want the readings to be the closest to the accurate, just like in the reloading works, the digital ones are the best.
Check Calibers for Reloading Buying Guide to know the best caliper for your reloading work.
How to Calibrate a Dial Calipers – The Step by Step process
Though both of the calipers are different, some of the steps of these processes are pretty similar. However, using digital calipers is easier than dial calipers. Let us know about Digital Caliper Calibration.
Step 1: Cleaning the Pads
You have to measure extreme accuracy. You cannot let dirt, dust, and residue ruin the measurement’s accuracy.
All you need is a clean contact surface so that you can measure with accuracy and precision. Like the dial caliper for reloading, you have to clean the residue and dirt from the surface with the digital ones.
For the process, try to use a clean cloth. Please rely on a lint-free cloth. Wipe off the contact pads carefully for more accurate results.
Step 2: Caliper Closure
There is a fixed portion of the caliper. Take a look there, and you will see a locking lever. The locking lever usually holds the contact pad by locking it correctly.
All you have to do is unlock this to calibrate the caliper. You must close the caliper completely after the unlocking process in terms of the digital caliper.
You have to screw down on the adjustment knob. Keep screwing down and wait. Slowly, the moving part of the caliper will move as far as it can move. All you have to do is wait for the last bit of movement.
Step 3: Swivel the Locking Lever
Now that you are done closing the calipers, you have to go through the movable part of the locking fixed pad. Keep pressing down and wait until it is firm on the moving pad part.
In this situation, you have to swivel the locking lever to lock the stationary pad in the correct position.
This will not happen unless you provide the required pressure against the moving pad. Do both of these processes together, and things will be perfect.
Step 4: Reset to Zero
Now, it is time for you to set the indicator to zero. Ensure that the moving and the stationary contact pads have a firm contact.
They should be locked in their place firmly. Here, you can rotate the knob to get to Zero. On the contrary, you can press the reset button. Gradually, all the digital readout digits will be set at “0.”
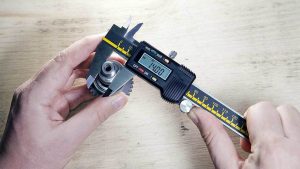
Step 5: Verify the Calibration
When it comes to digital calipers, most of them are available in either two calibration rods or three. The caliper’s reading range will be according to the size of the caliper rods.
In the automotive industry, digital calipers can read from 0 inches to 6 inches. If you want to read to 1-inch, you can settle for the smaller digital calipers of 0.5 inches long.
It depends on the caliper rods how many decimal points it will read. In some larger calipers, you might see half-inch calibration rods. There will be an added 1-inch or 2-inch calibration rod in this case.
Watch the video for more info.
Final Words
So, now, you have learned how to calibrate a caliper to obtain accurate readings. The methods mentioned above will help you get the proper reading without any glitches.
Which type of caliper do you use? Which caliper is easy while calibrate? Please write to us about your experience with the accuracy of the readings!
Other Source: All About Calipers